
We all know that Vector sometimes has problems to find his charger if the light is somewhat low. So some people already added lights to the charger. But wouldn’t it be nice if the light only is activated when the environment is getting dark?
This can be done relatively simple with a photo resistor tied to an Arduino (Uno or others). But I am not going into Arduino details here, so you need basic knowledge about that board and how to use it.
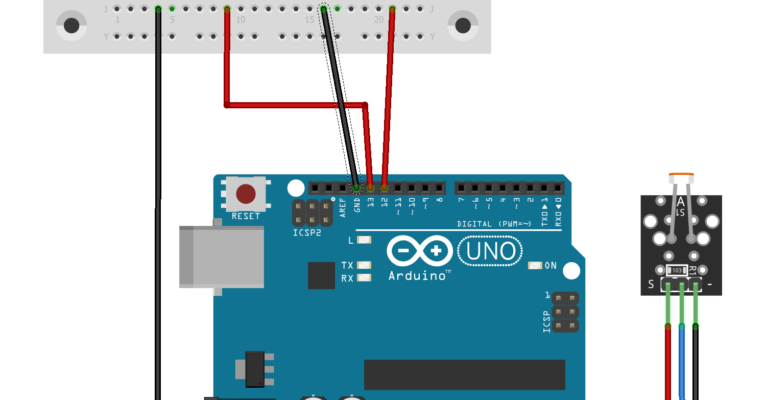
The photo resistor is connected to an analog input of the Arduino where you can read it’s value with a program and then, depending on the environment light, two LEDs are switched on or off.
You need the following:
- 1 Arduino (for example Uno, but others will work too)
- 2 LEDs (white are best)
- 2 resistors for the LEDs (see below)
- 1 photo resistor module
- 1 power supply for the Arduino
- 1 breadboard for testing
The resistors should be 100 Ohms, but that may vary with the exact LEDs you are using, please refer to the LED data sheet. For experiments a 9V battery is fine, but for long term you should use a power supply unit for the Arduino. You can get the photo resistor module on Amazon, ebay or Mouser, it is one like this from Keyes. For the Arduino there are lots of options out there: original ones or cheap copys from china. Usually they all work fine.
What you see below of course is a test installation, you may want to invent something to install the LEDs above Vector’s charger.
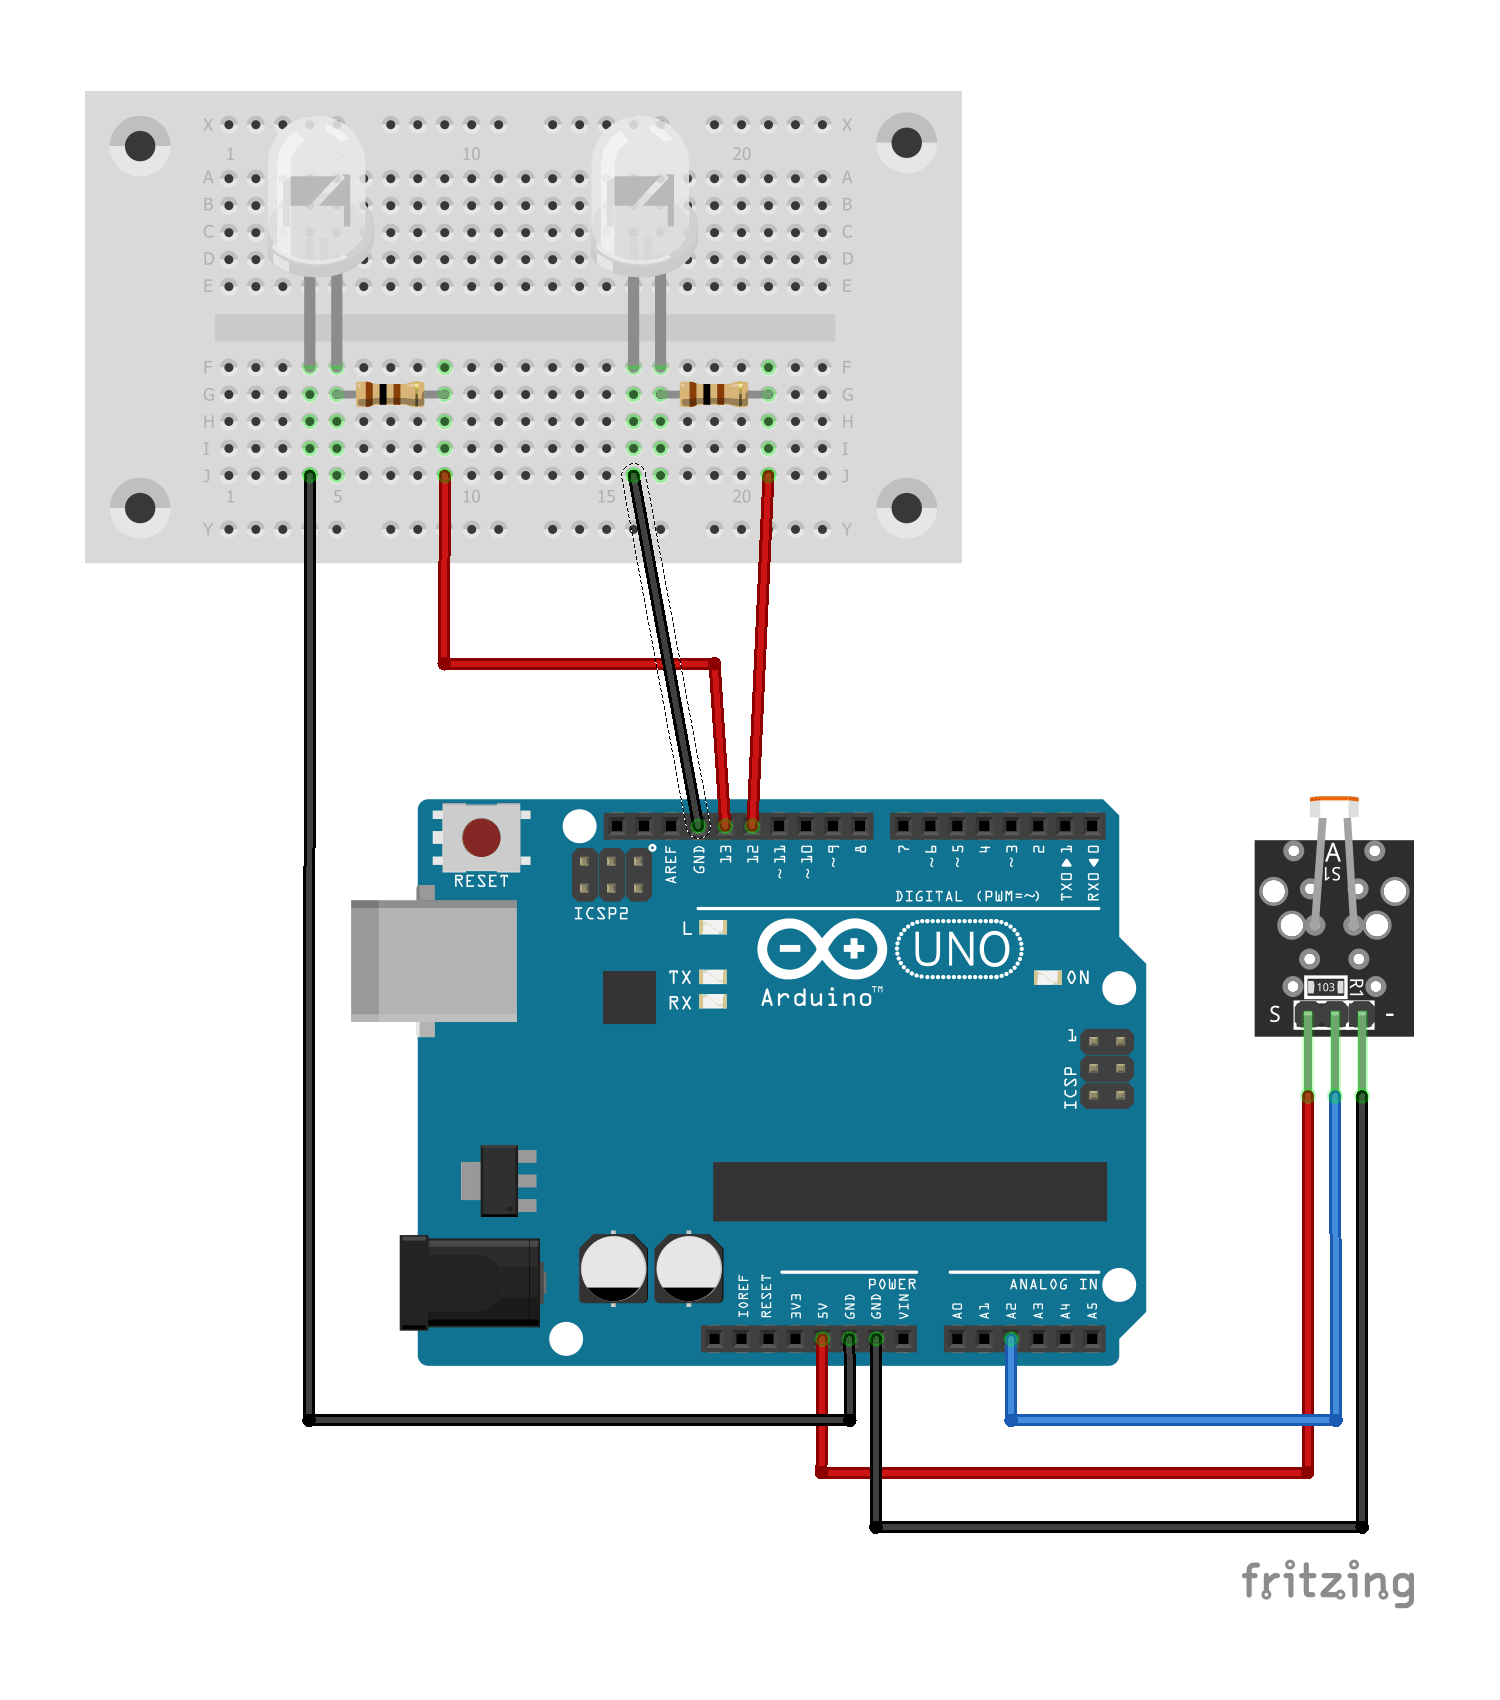
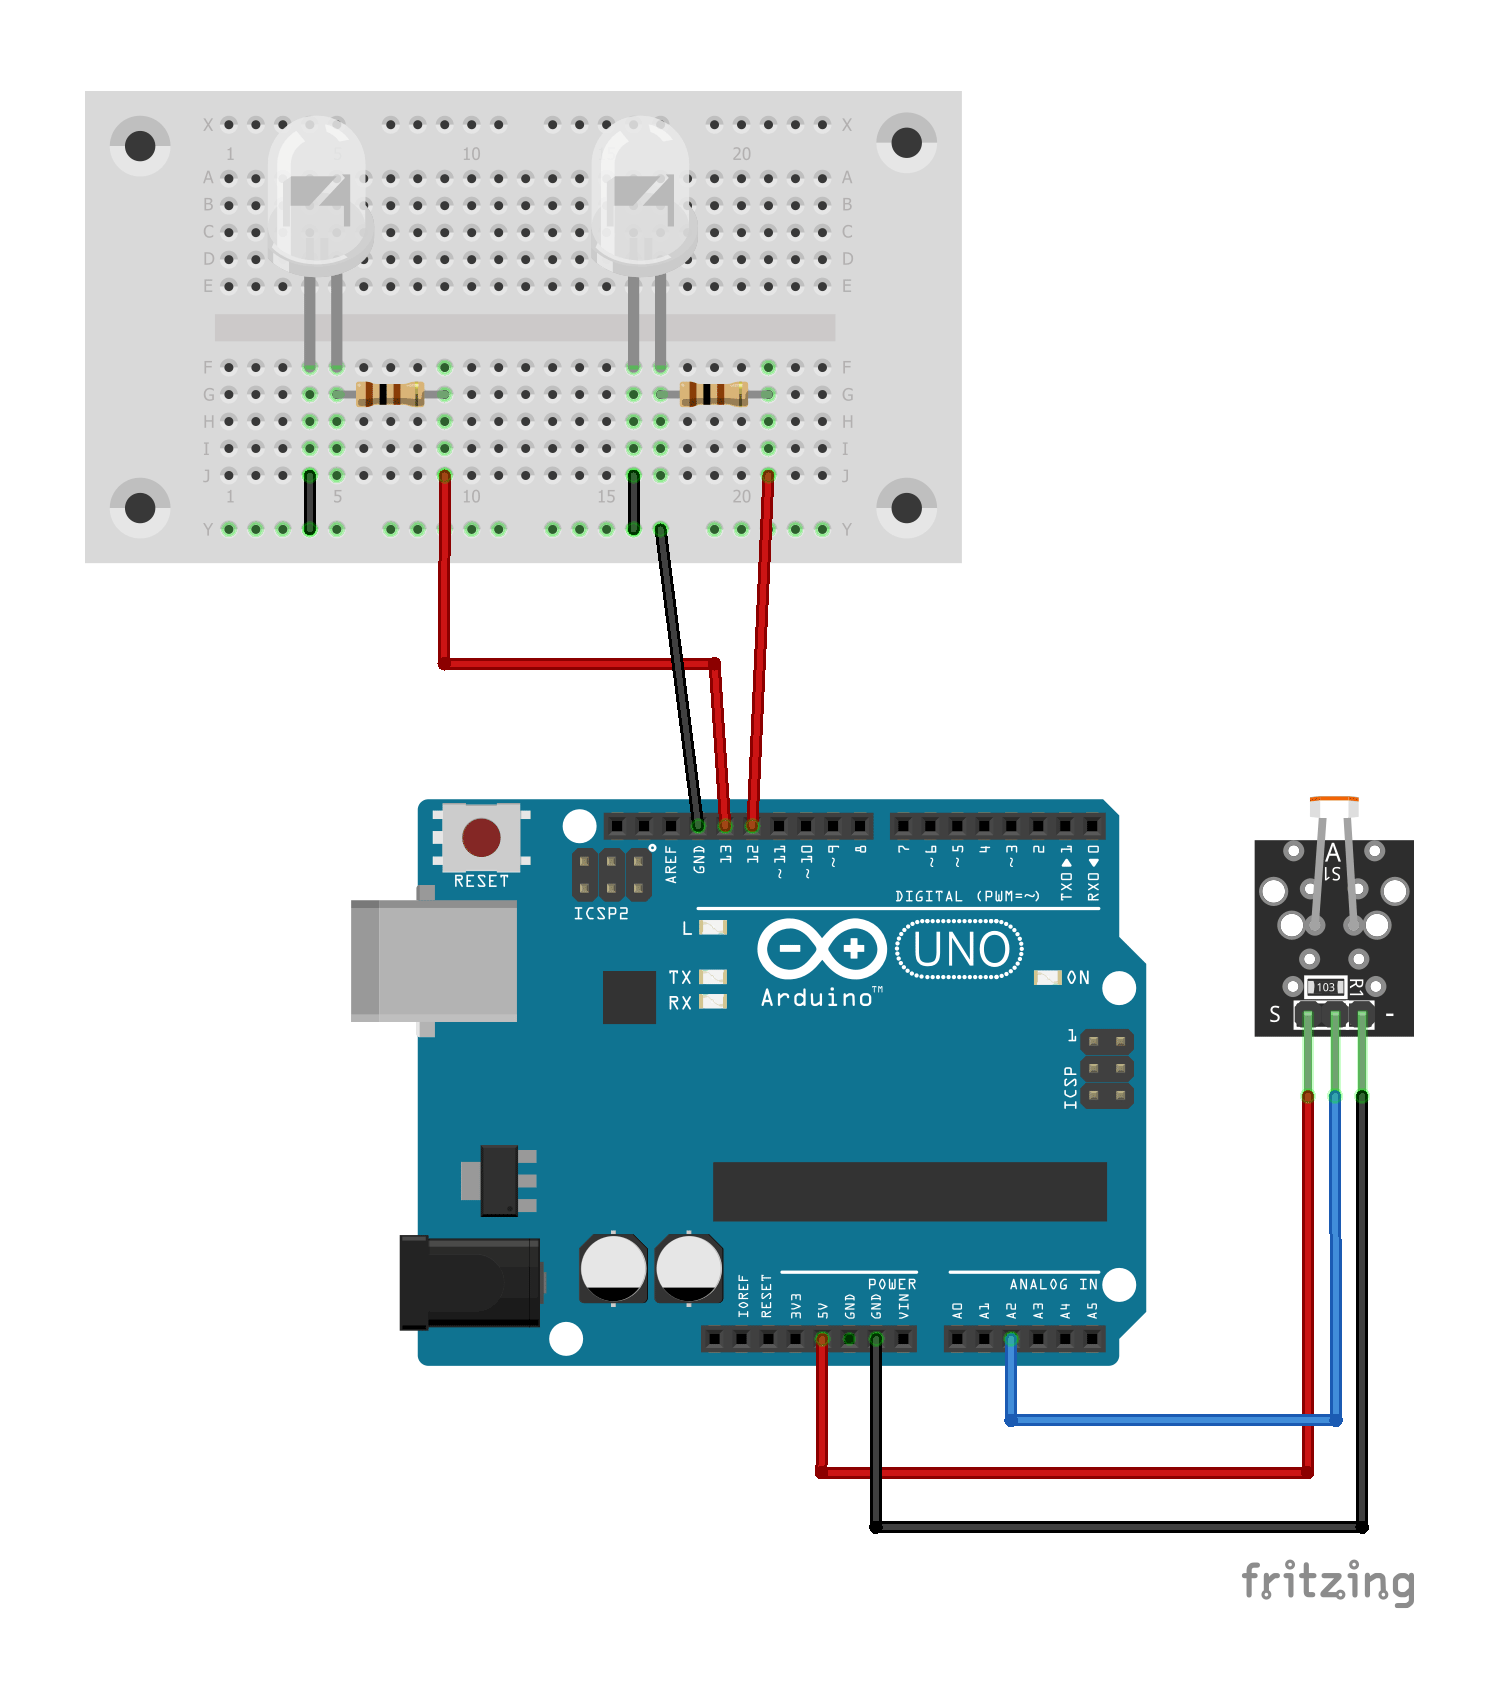
Wire the parts like one of the following schematics.
 You need to put the following code onto the Arduino board via the IDE:
int light = 0; // variable to store the light value from the photo resistor

void setup() {
// setup code, run once:
Serial.begin(9600); //configure serial to talk to computer
pinMode(13, OUTPUT); // set digital pin 13 as an output
pinMode(12, OUTPUT); // set digital pin 12 as an output
}

void loop() {
// your main code here, runs repeatedly:
light = analogRead(A2); // read value from photo resistor and set to variable

Serial.println(light); // print current value

if(light > 450) { // If it is bright ...
Serial.println("It is bright");
digitalWrite(13,LOW); // switch off output to turn LED off
digitalWrite(12,LOW); // switch off output to turn LED off
}
else(light > 0 && light < 451) { // light is low ...
Serial.println("light is low");
digitalWrite(13,HIGH); // switch left LED on
digitalWrite(12,HIGH); // switch right LED on
}

delay(1000); // delay so Arduino does not get spammed by photoresistor
}
Additional remarks:
It may be possible that you have to experiment with the light detection value of 450 to suit your needs.
In one of my setups the connector marks on the photo resistor were wrong (I had multiple of them from different sources). In that case you need to switch the red and black wires on the photo resistor.
This is of course a very simple setup that can be expanded, maybe you want to add a power switch to deactivate the setup for the night or maybe make it timed for that.
Have fun experimenting.
Very nice documentary. Very simple construction. Would be an option for my second Vector…
But the light is always on, even when he’s sitting on it, or did I misunderstand something…
I also have one on during the day, because he can see the station better, since 1.7 it has got worse anyway….
PS: The reference to Deepl is really great… :).
The light being on does not depend if he is sitting on the charger or not, it is dependend on the environment light.
It would be possible to add a photoelectric barrier to the setup to detect if Vector is sitting in his charger.
I solved this with an IR sensor from sharp. It has a range of five to six inches and sits in the roof over Vector. It was important to me to have an LED on during the day. I also have the SDK on the Pi and maybe he still packs the Escapepod.
My next project just started, doesn’t need anything except LEDs. Maybe one more transistor and LS for day-night. Let’s see. Vector switches off the light via the charging contacts. When he shuts down, it comes on. The charger delivers 5.18 volts, a resistor with 220 or 330 ohms should be enough. I’ve already uploaded the first image to FB. I soldered the ground in the Charger and glued the contact but otherwise it is unchanged… ?